Last updated: July 7, 2026 · [VERIFY: add real author or reviewer name in CMS]
You can usually recharge silica gel by heating clean loose beads at 110–120°C (230–250°F) for 1–2 hours, cooling them completely, and sealing them right away. Use a low oven as the default method because it gives steadier heat than a microwave. Before heating anything, check the label, remove any plastic housing, and confirm whether you have loose beads, an oven-safe packet, or a manufacturer-approved rechargeable insert.
Quick Answer
Recharge loose silica gel by spreading it in a single thin layer on an oven-safe tray and heating it at 110–120°C (230–250°F) for 1–2 hours. Let it cool completely, then seal it in an airtight container. Do not microwave unknown packets, plastic housings, stapled packets, or colored indicator beads unless the product label clearly says that method is safe.
Key Takeaways
- Use the oven method for the most controlled recharge, especially with loose beads.
- Do not heat the plastic body of a silica gel dehumidifier; remove the rechargeable insert or beads if the product allows it.
- Microwave only loose beads or packets clearly labeled as microwave-safe by the manufacturer.
- Blue cobalt-indicating beads commonly turn pink when wet and need extra handling care; orange or yellow beads often turn green when wet.
- Replace silica gel when it stays clumpy, crumbles, smells, remains discolored, or no longer controls moisture after recharging.
At a Glance
| Time Required | 1–2 hours in the oven, plus full cooling time |
| Difficulty | Easy, but heat control matters |
| Tools Needed | Oven-safe tray, oven thermometer, timer, heat-resistant gloves, airtight container, optional parchment paper |
| Cost | Usually no added cost unless you need replacement beads or a thermometer |
Warning: Keep silica gel away from children and pets. Standard white or clear silica gel is usually considered non-toxic, but packets can be a choking or blockage hazard, and dust can irritate eyes, skin, or lungs. If someone swallows silica gel or gets it in the eyes, follow guidance from Poison Control.
Which Silica Gel Recharge Method Should You Use?
Choose the method by the item you have, not by speed. Loose white or clear beads are the safest to dry in a low oven. Packets and rechargeable inserts depend on the product label because paper, adhesives, seams, dyes, and plastic parts may not tolerate heat.
| Method | Best For | Avoid When |
| Low oven | Loose beads, oven-safe packets, removable inserts | Plastic housing cannot be removed or label says single use |
| Microwave | Small batches of loose beads or labeled microwave-safe packs | Unknown packets, staples, metal, plastic, dye beads, odors, or scorch risk |
| Sunlight | Lightly damp beads on a dry, breezy day | Heavy saturation, humid weather, deep piles, or fast reactivation needs |
| Replace | Food, medicine, baby-product, chemical, mold, or unknown-use packets | Do not try to rescue contaminated or damaged beads with heat |
What You Need to Recharge Silica Gel
To recharge silica gel safely, set up a clean, dry, heat-safe workspace. Use a metal baking sheet, ceramic dish, or glass baking dish for the oven method. If the beads are loose, spread them in a single layer so heat can reach each bead. If they are inside a packet or rechargeable insert, check the label first. Some packets are oven-safe, some are microwave-safe, and some should not be heated at all.
Keep a timer, heat-resistant gloves, an airtight jar or resealable bag, and, ideally, an oven thermometer nearby. Many ovens run hotter than the dial says. Overheating can weaken the bead structure, damage indicator dyes, or scorch packet material.
Do not use kitchen tools again for food if they have held loose indicator beads, dusty beads, or beads from unknown sources. Use a dedicated tray or line the tray with oven-safe parchment when cleanup matters.
Note: Silica gel controls moisture by adsorption, which means water collects on the surface and inside the pores of the beads. Heating drives that water off so the beads can adsorb moisture again.
Before You Heat Silica Gel
Before recharging, identify exactly what you have. This step prevents most heat, contamination, and food-safety mistakes.
- Loose white or clear beads: These are usually the easiest to recharge in an oven.
- Color-changing beads: Follow the color system on the label. Blue beads commonly turn pink when wet. Orange or yellow beads often turn green when wet.
- Paper or fabric packets: Heat only if the product label allows it. Do not microwave unknown packets.
- Plastic dehumidifier canisters: Do not place the plastic housing in the oven or microwave. Remove only the approved rechargeable insert or beads if the design allows it.
- Food or medicine packets: Reuse only if they are clean, intact, and clearly food-safe. Do not place loose household-recharged beads directly into food, medicine, supplements, or baby products.
If the silica gel has touched oil, chemicals, solvents, mold, pet waste, or unknown residue, replace it instead of recharging it. Heat will not make contaminated beads safe again.
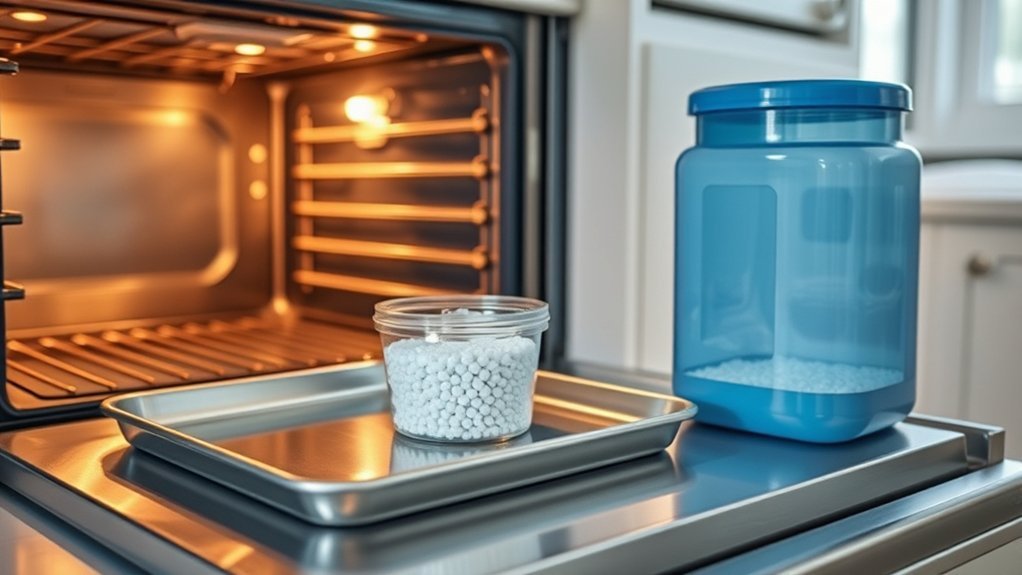
How to Recharge Silica Gel in the Oven
The oven method is the best default because it gives steady, controlled heat. Preheat the oven to 110–120°C (230–250°F), unless the product label gives a different safe setting. Spread the beads in a thin, even layer on a clean baking tray. For easier cleanup, line the tray with parchment paper rated for oven use at this temperature.
Bake the silica gel for 1–2 hours. Stir or gently shake the tray once halfway through if the layer is thick. For indicator beads, watch for the original dry color to return. For non-indicating beads, look for a dry, loose, free-flowing texture.
When the time is up, turn off the oven and move the tray to a dry cooling area. Do not seal hot beads right away. Hot beads can release vapor into the container, and that trapped vapor can undo your work.
| Step | Action |
| 1 | Preheat oven to 110–120°C (230–250°F). |
| 2 | Spread loose beads in a single layer on a clean heat-safe tray. |
| 3 | Bake for 1–2 hours, checking color and texture. |
| 4 | Let beads cool fully before sealing. |
| 5 | Store immediately in an airtight container. |
Pro Tip: Use an oven thermometer if you recharge silica gel often. A steady low temperature protects the bead structure better than guessing with a hot oven.
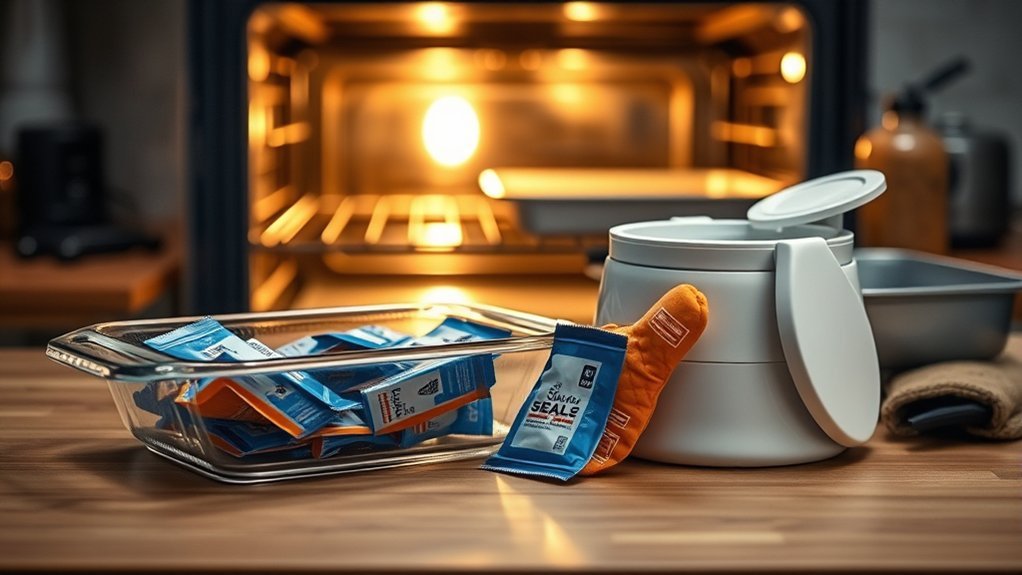
Can You Recharge Silica Gel Packets Safely?
You can recharge some silica gel packets, but the packet material matters as much as the beads. A clean paper or fabric packet may tolerate low oven heat if the label allows it. A packet with plastic film, glue that softens, a staple, a metal indicator window, or unknown lining should not go into a microwave and may not be safe for the oven.
If the packet came from medicine, supplements, baby products, pet treats, food packaging, or an unknown chemical product, treat it as single-use unless the manufacturer says otherwise. Replacement is safer than moving a questionable packet into a food jar, camera case, document box, or electronics bin.
Warning: Do not cut open unknown packets just to save the beads. Fine dust and indicator dyes can irritate your skin, eyes, or lungs, and loose beads create a spill and choking risk.
How to Recharge Silica Gel in the Microwave
The microwave method is faster, but it is not the safest general method. Use it only when you have loose silica gel beads or a packet that is clearly labeled as microwave-safe. Do not microwave unknown paper packets, plastic canisters, metal parts, stapled packets, glued seams, or color-indicating beads unless the manufacturer specifically allows it.
Place a small amount of loose beads in a microwave-safe glass or ceramic dish. Heat in short 20–30 second bursts on medium power. Stir or swirl the dish between bursts, and stop as soon as the beads return to their dry color or dry, free-flowing texture. Let them cool fully before storage.
- Stop immediately if you notice smoke, odor, scorching, melting, popping, or swelling.
- Do not leave the microwave unattended.
- Do not microwave beads that came from a plastic dehumidifier body unless the label says to do so.
- Do not use a microwave for contaminated beads.
For most home users, the oven method is slower but more reliable.
How to Dry Silica Gel in Sunlight
Sunlight can help dry mildly damp silica gel, but it is a backup method, not the best way to fully reactivate heavily saturated beads. Use it when you want a low-energy option and the beads are only slightly damp or slightly changed in color.
Spread the beads in a thin layer on a clean tray. Place the tray in a warm, dry, breezy area where it will not be splashed, blown away, or reached by children or pets. Rotate the tray or stir the beads every hour so air and light reach more surface area.
Best Sunlight Setup
Choose a dry day with good airflow. A low tray works better than a deep bowl because piled beads trap moisture. Keep the tray away from shaded spots, wet patios, kitchens, bathrooms, and laundry areas. If the beads still clump or feel cool after several hours, finish them in the oven instead.
- Use a shallow tray, not a jar or deep container.
- Keep the beads in a single, even layer.
- Bring them inside before evening humidity rises.
Drying Time Factors
Sunlight drying depends on heat, humidity, airflow, bead depth, and how wet the beads are. A thin layer on a breezy, dry day may improve in a few hours. A thick pile on a humid day may barely improve at all.
If you use indicator beads, color change is your best clue. If you use white or clear non-indicating beads, rely on texture. Dry beads should pour freely and should not stick together.
Checking Bead Readiness
Check readiness by color, texture, and performance. Dry silica gel should feel loose and light, not sticky or damp. If you place the recharged beads in a sealed container with a small humidity indicator card, the container should stay dry over time. If humidity rises quickly, the beads need more drying or replacement.
How to Tell When Silica Gel Is Dry
You can tell silica gel is dry when it returns to its original dry color, pours freely, and no longer clumps. Indicator beads make this easier, but non-indicating beads can still be checked by texture and performance.
Color Change Signals
Different indicator beads use different color systems, so follow the label when you have one.
- Blue to pink: Blue commonly means dry, and pink means moisture-loaded. Many blue beads use cobalt chloride as the indicator.
- Orange or yellow to green: Orange or yellow commonly means dry, and green means moisture-loaded.
- No color change: White or clear beads may not visibly change, so use texture and performance checks.
Blue cobalt-indicating silica gel needs extra care. The International Chemical Safety Card for cobalt chloride lists inhalation, eye, reproductive, cancer, and environmental hazards for cobalt chloride. Avoid dust, keep dyed beads away from food, and replace damaged or leaking packets instead of handling loose dyed beads.
Bead Texture Check
Dry beads should feel loose, hard, and free-flowing. They should not stick to each other, smear, feel gummy, or leave residue on your fingers. If the beads clump after oven drying, they may still contain moisture or may be worn out.
Free-Flowing Dryness
Shake the cooled beads gently in a dry jar. If they move like small dry gravel, they are likely ready. If they move in chunks or cling to the container, dry them longer at low heat or replace them.
The safest sign of success is not just color. Recharged silica gel should be cool, dry, loose, clean, and sealed away before it can pull moisture back from room air.
Common Silica Gel Recharge Mistakes
Most recharge problems come from too much heat, the wrong container, or sealing beads before they cool. Avoid these mistakes:
- Heating plastic housings: Remove only the approved insert or beads. Never place a plastic dehumidifier body in the oven.
- Overheating: Stay near 110–120°C (230–250°F). Higher heat can weaken beads or damage indicator dyes.
- Microwaving unknown packets: Paper, fabric, adhesives, plastic, or metal parts may be unsafe in a microwave.
- Sealing hot beads: Let them cool fully first so vapor does not condense inside the container.
- Recharging contaminated beads: Oil, chemicals, mold, or unknown residue means replacement is safer.
- Piling beads too deep: A thick layer dries unevenly, leaving wet beads in the middle.
Troubleshooting After Recharging
| Problem | Likely Cause | What to Do |
| Beads still clump | Still damp or packed too deeply | Spread thinner and dry longer at low heat. |
| Color does not return | Not fully dry, overheated, or indicator worn out | Dry once more carefully. Replace if color still fails. |
| Beads smell burnt | Overheating or contaminated material | Stop using them and replace the beads. |
| Moisture returns quickly | Poor storage or exhausted beads | Store airtight. Replace if performance stays weak. |
How to Store Recharged Silica Gel
Once your silica gel is dry and cool, store it immediately in an airtight container. Glass jars with tight lids, clean metal tins, and heavy resealable bags work well. Label the container with the recharge date so you can track performance.
Store the container in a cool, dry place away from sinks, bathrooms, laundry rooms, direct sunlight, heaters, and vents. Reseal the container every time you remove beads. If you leave recharged silica gel exposed on a counter, it starts adsorbing moisture from the room right away.
- Use a clean, dry container.
- Keep indicator beads away from food unless the product is clearly food-safe.
- Inspect packets often for tears, leaks, softness, or color change.
How Many Times You Can Reuse Silica Gel
There is no reliable universal number of times you can reuse silica gel. Clean beads can often be recharged many times if you use low heat, avoid contamination, and store them airtight. Their useful life depends on bead quality, heat exposure, moisture load, and handling.
| Condition After Recharge | What It Means |
| Returns to dry color and pours freely | Good candidate for reuse |
| Takes much longer to dry than before | Capacity may be declining |
| Stays clumpy, dull, or discolored | Replace it |
| Crumbles, smells, melts, or leaks dye | Discard safely and replace |
Use performance as your guide. If the beads still keep a sealed container dry after recharging, you can keep using them. If they stop working, replace them instead of using more heat.
When to Replace Silica Gel Beads
Replace silica gel beads when recharging no longer restores reliable moisture control. Do not keep reheating beads that are visibly damaged, contaminated, or permanently discolored.
- Replace beads that stay clumpy after proper oven drying.
- Replace beads that crumble, powder, leak dye, or smell burnt.
- Replace packets that are torn, stained, oily, moldy, or unknown.
- Replace indicator beads that no longer return to their normal dry color.
- Replace any silica gel that has touched chemicals, solvents, food spills, or pet waste.
Fresh beads are inexpensive compared with the damage caused by trapped moisture, mold, rust, or ruined stored items.
When Not to Recharge Silica Gel
Recharging is not always the right move. Skip the process and replace the desiccant if:
- The packet says “single use” or gives no safe heating instructions.
- The beads are inside a sealed plastic device that is not designed to open.
- The packet has metal, staples, unknown lining, or melted areas.
- The beads were used near chemicals, oils, pesticides, fuel, or strong odors.
- You need desiccant for medicine, food, baby products, or sensitive electronics and cannot confirm the beads are clean and appropriate.
When in doubt, replacement is safer than guessing.
Final Safety Check Before Reuse
Use the recharged silica gel only after it is cool, dry, loose, clean, and sealed. Choose the oven for most loose beads, choose the microwave only when the label allows it, and replace any packet or bead that looks damaged, contaminated, or unsafe. If you plan to use silica gel around food, medicine, children, pets, or sensitive electronics, trust the product label over a general home method.
Frequently Asked Questions
How do you recharge a silica gel dehumidifier?
Check the product label first. If the dehumidifier has a removable rechargeable insert or loose beads, dry that part at about 110–120°C (230–250°F) for 1–2 hours. Never heat the plastic outer housing unless the manufacturer specifically says it is safe.
Can you recharge silica gel packets in the oven?
You can recharge many silica gel packets in a low oven only if the packet material is heat-safe or the label allows it. For unknown packets, loose beads are safer than heating the packet itself. Use low heat, avoid overheating, and let everything cool fully before storage.
Can you recharge silica gel in the microwave?
Only microwave loose silica gel beads or packets clearly labeled as microwave-safe. Use short bursts, stir between bursts, and watch closely. Do not microwave unknown packets, plastic canisters, metal parts, or colored indicator beads unless the manufacturer approves it.
How do you know when silica gel is dry again?
Indicator beads should return to their normal dry color. Blue beads commonly return from pink to blue, while orange or yellow beads often return from green to orange or yellow. Non-indicating beads should feel hard, dry, and free-flowing with no clumps.
How many times can you recharge silica gel?
There is no fixed number that applies to every bead or packet. You can keep recharging clean silica gel as long as it returns to its dry color or texture and still controls moisture. Replace it when performance drops, color no longer resets, or beads become damaged.