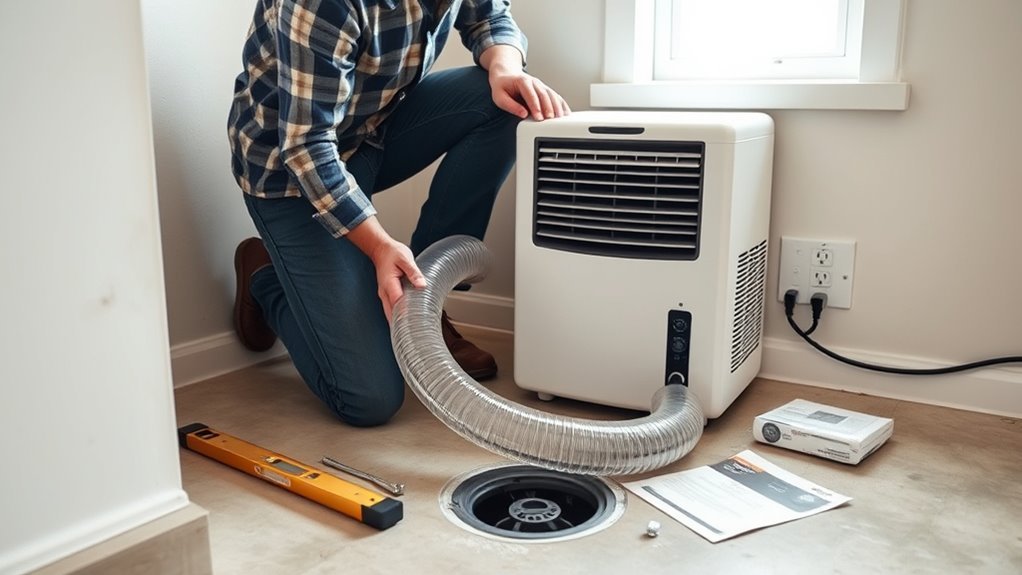
Gather the drain tube, a 3.5-inch washing machine hose, a utility knife, and a hose clamp. Remove the rear knockout with a flathead screwdriver, then insert the tube with the arrow facing up and seat it firmly. Attach the hose, trimming it if needed, and route it straight down to a floor drain with no kinks. If the unit sits above drain level, use a condensate pump. A few more checks can help you avoid leaks and backups.
What You Need to Connect a Drain Hose?
To connect a dehumidifier drain hose, you’ll need the included drainage tube from the unit and a 3.5-inch washing machine hose for a secure fit. You’ll also want a utility knife, since you may need to trim one end of the hose for clean insertion. Keep a hose clamp nearby to lock the connection and reduce leak risk during continuous drainage. Before you begin, check your dehumidifier’s manual for model-specific guidance, because manufacturers can specify different fittings or orientation rules. When you handle the drainage tube, confirm the arrow points up so water flows correctly through the drain hose assembly. Gather every part first; that preparation saves time and prevents frustration. With the right pieces in hand, you can set up a reliable, low-maintenance drainage path and keep moisture control working on your terms.
Remove the Knockout and Install the Tube
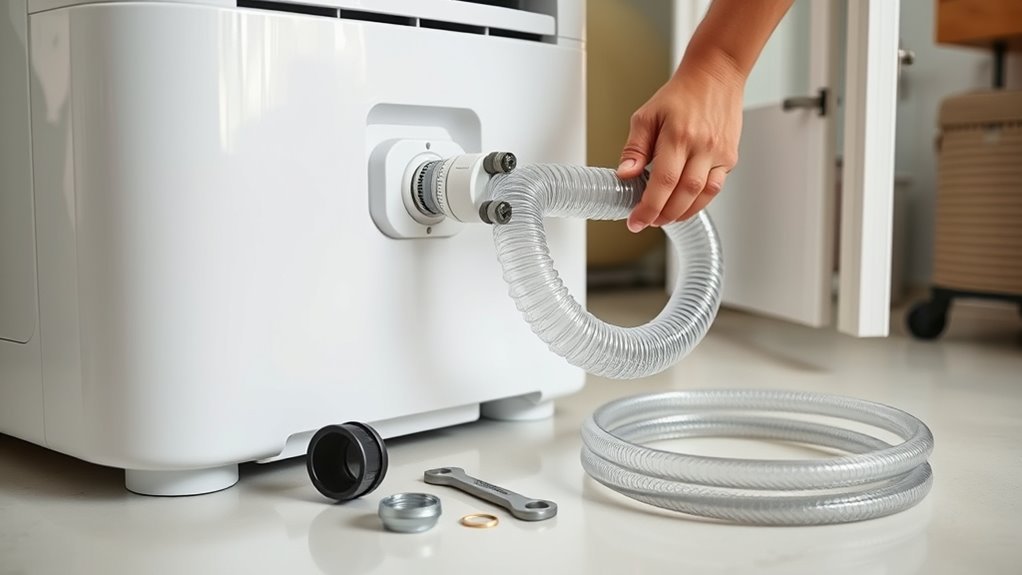
Locate the round knockout on the rear of the dehumidifier and remove it with a flathead screwdriver to open the drain port. Insert the drain tube into the opening, then align it so the arrow points up for correct flow direction. Push the tube in firmly so it seats properly before you connect the other end.
Remove Rear Knockout
Remove the round knockout plug from the rear hose port to open the drainage path, then insert the included tube into the hole with the arrow pointing upward. You’re now clearing the route so the unit can remove the water without relying on the bucket. Seat the tube firmly at the rear connection where the bucket normally sits, then check that the fit is tight.
| Check | Action |
|---|---|
| Rear port | Confirm the round hole is open |
| Tube direction | Keep the arrow pointing up |
| Flow path | Verify nothing blocks drainage |
A clean, aligned connection gives you control and keeps water moving out as intended. Inspect the tube for kinks or twists, since even a small bend can restrict flow and reduce performance.
Insert Drain Tube
With the knockout opening clear, insert the included drain tube into the rear port and make sure the arrow on the tube points upward. Push the insert drain tube firmly until it seats fully in the opening, so you create a stable path for continuous drainage. Then route the other end to the space where the bucket normally sits, and secure the connection tightly to stop leaks. If you’re using a washing machine hose, trim one end first so it fits snugly before attachment. Keep the hose free of twists, kinks, and blockages, because unrestricted flow preserves performance and keeps you in control of moisture removal. Check the joint periodically and correct any looseness right away.
Align Arrow Up
Once you’ve exposed the rear drain opening, remove the knockout and insert the included tube into the hole with the arrow facing up. That arrow marks the correct orientation for gravity-fed drain flow, so don’t reverse it. Push the tube in fully until it seats firmly at the bucket cavity where the bucket would normally sit. This creates a secure path for water to drain without backflow. If your setup needs more reach, you can trim a 3.5-inch washing machine hose to fit the outlet snugly. After installation, check the connection for leaks and make sure the tube stays straight, not kinked. A clean, aligned drain path keeps your dehumidifier working freely and efficiently, without unnecessary restriction.
Attach the Dehumidifier Drain Hose Securely
You’ll secure the drain tube in the drainage hole so it fits firmly and the arrow points upward for correct water flow. Then you’ll connect the 3.5-inch washing machine hose to the tube and trim one end if needed for a tight seal. After that, check each connection for leaks and make sure the hose runs without kinks.
Secure Hose Connection
Start by inserting the drainage tube into the dehumidifier with the arrow on the tube pointing upward, then attach the other end securely where the bucket normally sits so it fits snugly and doesn’t leak. You’re making a secure hose connection that lets water leave on its own, without relying on a bucket or constant supervision. Use a 3.5-inch washing machine hose for best compatibility, and trim one end if needed for a tight seat. Keep the hose straight and free of kinks so flow stays clear and uninterrupted. After installation, check both ends for gaps, drips, or loosening, and tighten them immediately. Reinspect the connection regularly to prevent water damage, protect your space, and keep drainage efficient and reliable over time.
Fit Drain Tube Properly
Remove the knockout at the back of the dehumidifier to open the drain port, then insert the included drain tube with the arrow facing upward so water flows correctly. To fit drain tube properly, push it straight into the rear opening until it seats firmly and locks the drainage path. Then guide the other end into the bucket slot area, using a 3.5-inch washing machine hose for a snug, stable fit. If your unit uses a pump, remove the black cover first and seat the hose securely in the pump opening.
- Keep the tube aligned, not twisted.
- Match the tube depth to the port.
- Confirm the hose doesn’t slip under tension.
When you fit drain tube properly, you claim control over clean, hands-free drainage.
Check For Leaks
Once the drain hose is attached, check the connection for leaks by making sure it sits securely in the drainage opening where the bucket normally goes and that the arrow on the hose points upward. You should use a 3.5-inch washing machine hose, trimming one end if needed for a tight seal. Inspect the joint where the hose enters the unit, then run water briefly and check for leaks at every contact point. If you see seepage, push the hose in farther or recut the end for a firmer fit. Also verify that the hose stays free of kinks, since bends can block flow and strain the connection. Monitor the system for the first few days so you can confirm steady drainage and no leaks.
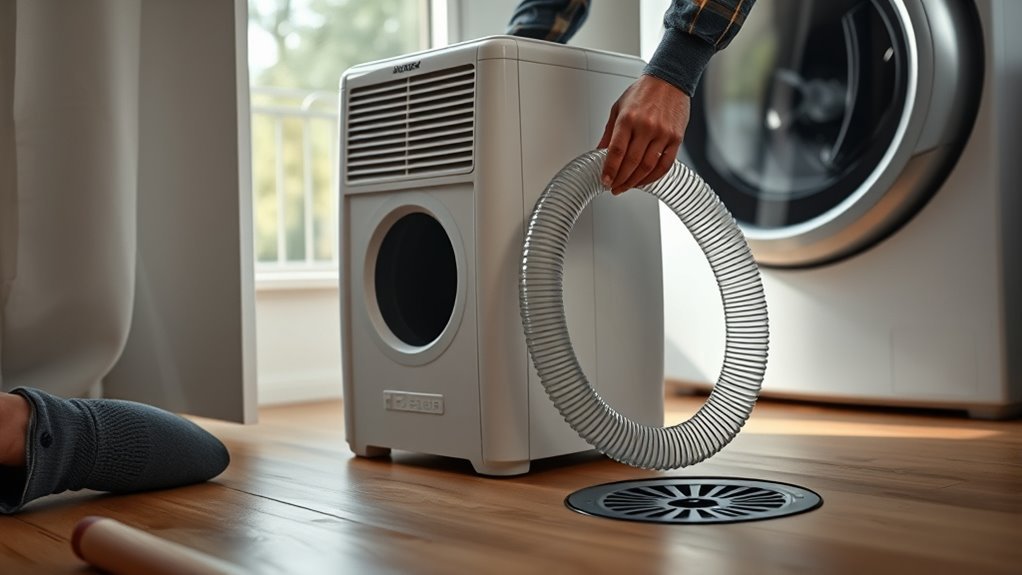
Run the Hose to a Floor Drain
After you insert the drainage tube, connect a 3.5-inch washing machine hose to it and run the hose directly to a floor drain. Keep the route as straight as possible so gravity can move water without resistance. If the hose end doesn’t fit tightly, trim it for a snug connection.
- Verify the drainage tube’s arrow points upward before sealing the joint.
- Eliminate kinks, sharp bends, and crushed sections along the run.
- Secure the hose and inspect the floor drain path for steady flow.
A clean, direct line gives you control over condensate removal and reduces the chance of overflow. Push each connection firmly, then check for drips after the unit starts cycling. If you notice pooling, realign the hose immediately. You’re building a low-maintenance drain path that works with the machine, not against it.
Use a Pump for Elevated Units
If your dehumidifier sits above the drain level, connect a condensate pump to the drainage hose so it can move water uphill to the drain. Remove the pump’s black cover, then insert the hose securely into the opening. The hose typically should fit snugly; that tight fit helps prevent leaks and keeps the pump operating efficiently. Route the discharge line to your drain and trim excess length if needed so you don’t create slack that can impede flow. Keep the run direct and stable, and secure the pump where it won’t shift during operation. After startup, check the pump and hose connection during the first few days for any seepage or weak discharge. By using a pump, you free your setup from gravity limits and keep moisture removal under your control.
Check for Kinks, Leaks, and Proper Flow
Inspect the hose regularly for kinks, because even a slight bend can slow drainage and reduce efficiency. You need a clear, downward path so gravity can move water away without resistance. Check every connection at the dehumidifier and the drain point; if you feel looseness, reseat the hose and secure it firmly. Any leak can waste water and damage floors or walls, so watch for drips during startup.
- Trace the hose length and remove any kinks or sharp bends.
- Confirm the hose slopes downward from the unit to the outlet.
- Verify the bucket stays in place if your model requires it.
Run the system for the first few days and inspect it often. That early monitoring lets you catch flow problems before they spread. When the setup stays tight, straight, and dry, you keep control of moisture and protect your space from avoidable damage.
Frequently Asked Questions
How to Connect a Drain Hose to a Dehumidifier?
Remove the knockout, insert the tube with the arrow up, and connect a 3.5-inch washing machine hose. If needed, use a pump for Hose Types compatibility. Check fittings for leaks, then monitor drainage closely.
Can You Hook up a Hose on a Dehumidifier to Drain Itself?
Yes, you can hook up a hose so your dehumidifier drains itself. Use the right Drainage Solutions, insert the hose correctly, keep the arrow up, and you’ll free yourself from bucket-emptying while monitoring leaks.
Where Does the Hose Go on a Dehumidifier?
You place the hose at the dehumidifier’s rear drain port, where the bucket normally sits. Check hose placement, remove any knockout, insert the tube securely, and keep the connection tight to prevent leaks and unwanted water damage.
Does a Dehumidifier Help With Rhinitis?
Yes, a dehumidifier can help with rhinitis by lowering indoor moisture, reducing mold and dust mites, and improving Allergy Relief. You’ll often breathe easier when you keep humidity around 30%–50%.
Conclusion
Now you’ve got your dehumidifier drain hose connected, you can keep moisture under control without constant emptying. Check the fitting, secure the line, and route the hose to a drain or pump it upward when needed. Inspect for kinks, verify for leaks, and confirm steady flow. When you connect, route, and test with care, you get reliable drainage, cleaner air, and less maintenance. That means your unit works harder, so you don’t have to.