Knowing how to clean a robot vacuum main brush helps you remove tangled hair, restore dirt pickup, and prevent unnecessary wear. Pet hair, threads, and dust can build up around the roller and its end caps. With a few basic tools and the correct cleaning method, you can keep the brush working without damaging delicate parts.
Quick Answer
To clean a robot vacuum’s main brush, turn off the machine and remove it from the dock. Open the brush cover, lift out the roller, and cut away tangled hair. Clean the end caps and brush housing, then wipe or rinse the roller only as your model allows. Reinstall everything once dry.
At a Glance
| Difficulty | Easy, basic maintenance |
| Tools Needed | Small scissors or a brush-cleaning tool, microfiber cloth, debris container, and model instructions |
Why Main Brush Cleaning Matters
)
The main brush loosens dirt and guides debris toward your robot vacuum’s suction opening. When hair wraps around the roller, it can restrict rotation and reduce cleaning performance.
A clean brush makes better contact with carpets and hard floors. It also reduces unnecessary resistance on the brush motor.
If you ignore heavy buildup, several problems may develop:
- Reduced pickup: Hair and dirt remain on the floor after cleaning.
- Extra motor strain: A tangled roller becomes harder to turn.
- Unusual noise: Trapped debris can cause clicking, grinding, or rattling.
- Premature wear: Friction may damage end caps, bearings, or brush components.
- Cleaning interruptions: The robot may stop and display a brush-related error.
Pet owners often notice these problems sooner because fur can collect around the roller after repeated cleaning runs.
Cleaning the brush also helps maintain consistent floor coverage. The vacuum can spend more time collecting dirt and less time stopping because of brush obstructions.
Signs Your Main Brush Needs Cleaning
A robot vacuum’s main brush needs attention when you see wrapped hair, hear unusual sounds, or notice poor dirt pickup. You do not need to wait for an error message before checking it.
Look for these warning signs:
- Visible hair buildup: Hair, string, or carpet fibers wrap tightly around the roller.
- Grinding or clicking: The brush struggles against trapped debris.
- Dirt left behind: The vacuum passes over debris without collecting it.
- Brush-stuck warnings: The robot reports a jam or stops cleaning.
- Stiff rotation: The removed roller or its end caps do not move freely.
- Unusual heat or odor: Resistance or damaged parts may be causing friction.
These symptoms match problems described in the ECOVACS main brush cleaning instructions, which identify clicking noises, entanglement warnings, and poor pickup as reasons to inspect the brush.
If the robot still leaves dust behind after brush cleaning, inspect the dustbin, filter, and suction opening. A blocked airflow path can reduce pickup even when the roller works correctly.
Navigation problems, however, may come from dirty sensors or tangled wheels rather than the main brush alone.
How to Prep for Cleaning
Prepare your workspace before removing the main brush. A stable surface and basic cleaning tools make the process easier and help prevent small parts from getting lost.
Start by identifying your robot’s brush-cover mechanism. Most models use release tabs or clips, but the exact design varies.
Power Off First
Turn off the robot vacuum completely and remove it from the charging dock. This reduces the risk of accidental brush movement while your fingers are near the roller.
Place the machine upside down on a clean, dry, stable surface. Support it with a soft cloth if needed to avoid scratching the top.
If your model has a removable water tank, follow its instructions before turning the robot over. Emptying or removing the tank may prevent leaks.
Make sure the machine is powered off rather than simply paused. Pausing a cleaning cycle does not always prevent the device from restarting.
Gather Cleaning Tools
You only need a few household items to remove most brush tangles. Use tools that let you reach wrapped hair without scratching the roller or its housing.
- Small scissors: Cut hair and threads wrapped around the brush.
- Microfiber cloth: Wipe loose dust from the roller and compartment.
- Small container: Collect removed hair, dirt, and detachable parts.
- Brush-cleaning tool: Use the manufacturer’s tool if one is supplied.
- User manual: Confirm how your specific brush, bearings, and end caps come apart.
Keep these items within reach before opening the brush compartment.
Clear Brush Access
Turn the robot over and locate the main brush cover on its underside. It normally sits between or near the main drive wheels.
Check for release buttons, plastic tabs, or sliding latches. Press them as directed and lift the cover gently.
If the cover does not release, do not force it. Some models use a different locking system or removable fasteners.
Keep any screws, clips, or separate covers together so they are easy to find during reassembly.
How to Clean a Robot Vacuum Main Brush Safely
Removing the main brush is usually straightforward once you open its cover. The key is to lift the roller in the correct direction without bending its ends or damaging the drive connection.
- Confirm the robot is off. Keep it away from the charging dock during maintenance.
- Release the brush cover. Press the retaining tabs or follow your model’s removal method.
- Lift out the roller. Gently raise the designated end and release the other side from its drive fitting.
- Check the orientation. Identify which end connects to the motor and which fits the support bearing.
- Place the brush on a clean surface. Keep it away from moisture until you confirm whether washing is permitted.
Some robot vacuums use one roller, while others use two rubber extractors. The removal method may differ between these designs.
Pro Tip: Take a photo of the brush and its end caps before removing them. This gives you a visual reference for their correct position during reassembly, especially if your vacuum has two rollers.
Do not pull on the rubber blades or bristles to remove the roller. Hold its solid ends whenever possible.
Once removed, inspect the entire brush for damaged fins, bent bristles, or tightly wrapped threads.
Cut Away Tangled Hair
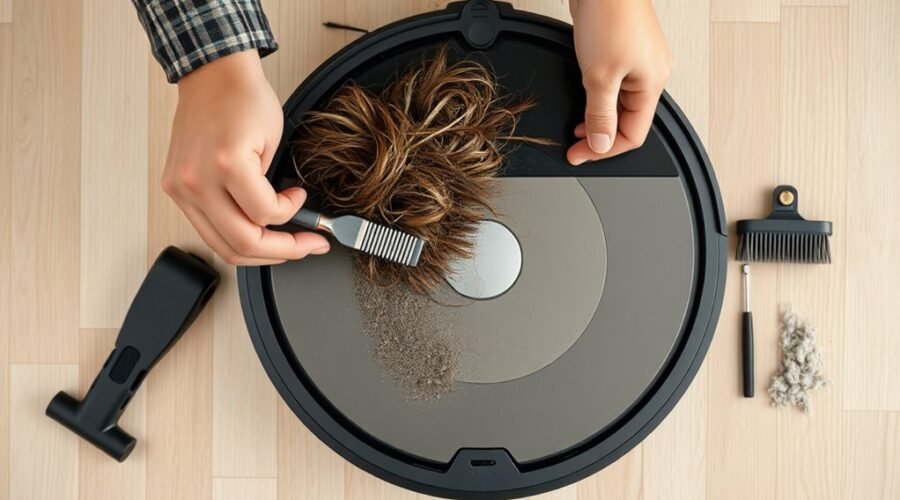
Cutting away wrapped hair is usually the most effective way to clean a tangled main brush. Work carefully along the roller’s cleaning grooves instead of pulling tightly wrapped strands by force.
Many robot vacuum brushes have a groove designed to help guide a cleaning blade or scissors beneath the hair.
Safe Hair Removal
Use a dedicated brush-cleaning tool or small scissors to cut tangled strands. Hold the removed roller securely and keep the blade away from rubber fins and bristles.
Warning: Do not force sharp scissors or knives between tightly packed hair and the roller. You could cut the rubber fins, damage the brush core, or injure your hand. Use short, controlled cuts instead.
- Find the area where hair is wrapped most tightly.
- Slide one scissor tip carefully beneath the strands, preferably along a cleaning groove.
- Cut the strands in small sections without touching the brush surface.
- Lift away the loose hair with your fingers or cleaning tool.
- Repeat until the brush is free from visible tangles.
The Xiaomi Robot Vacuum X20 Pro cleaning instructions recommend cutting wrapped hair with scissors and avoiding forceful pulling.
For a robot vacuum with long rubber extractors, inspect the grooves between the raised rubber blades. Hair can become trapped there even when the roller looks clean from above.
Clean Brush Grooves
After removing the main tangles, inspect the brush grooves for shorter fibers and compacted dirt. These smaller obstructions can continue to restrict movement.
Gently loosen debris with the manufacturer’s cleaning tool or a soft cloth. Work along each groove until it is clear.
Pay particular attention to the areas close to the roller ends. Hair often accumulates around the shaft where it may be harder to notice.
Also check the brush housing and suction opening for loose strands. Removing hair from the roller alone will not solve a blockage inside the compartment.
Clean the End Caps and Bearings
Brush end caps and bearings deserve careful attention because hair can collect underneath them. Even a clean-looking roller may struggle to spin if these small parts remain blocked.
The end caps sit at the ends of the brush. Bearings or support fittings help the roller turn smoothly.
Follow these steps:
- Inspect both ends. Look for hair wrapped around the shaft or trapped beneath the end caps.
- Remove detachable caps. Pull or twist them only as your model instructions allow.
- Clear trapped fibers. Gently remove hair and grit from the accessible bearing areas.
- Wipe the parts. Use a microfiber cloth to remove remaining dust.
- Check movement. Confirm that the parts designed to rotate can move without binding.
- Refit the caps. Reattach each one in its original position.
Do not pry open sealed bearings or remove permanently attached parts. You may damage components that are not designed for user maintenance.
A damaged bearing may feel rough, stick during rotation, or make a grinding sound. If cleaning does not resolve the problem, the roller may need replacement.
Keep all detachable end caps dry unless your manufacturer’s instructions specifically allow washing them.
Rinse and Dry the Brush Roll
Some robot vacuum brush rolls can be rinsed with water, while others should only be wiped clean. Always follow your model’s maintenance instructions before getting the roller wet.
For example, the eufy X10 Pro Omni manual allows rinsing its rolling brush and brush guard under running water. It also requires both parts to air-dry completely before installation.
Other models, including certain Roborock vacuums, specify wiping the main brush with a damp cloth instead of rinsing it.
Warning: Never rinse the robot vacuum itself or immerse a brush assembly containing electrical parts. Do not soak the roller unless the manufacturer explicitly permits it. Water trapped in bearings or the brush core can cause damage.
If your brush is washable, follow this process:
- Remove loose hair and debris before washing.
- Rinse the permitted brush components under lukewarm running water.
- Gently wipe away remaining dirt with a microfiber cloth.
- Shake off excess water without striking the roller against a hard surface.
- Leave the brush in a ventilated area to air-dry.
- Check that the roller and all removable parts are completely dry before reassembly.
Allow at least a few hours for drying and longer if moisture remains. The actual drying time depends on the brush design and surrounding conditions.
Keep the brush away from direct heat, hair dryers, and strong sunlight. Excessive heat can damage rubber and plastic components.
Avoid bleach, harsh disinfectants, and unsuitable cleaning chemicals. They may degrade brush materials or leave residue.
If your model does not permit rinsing, remove debris with a dry cloth or use a lightly dampened cloth only when the instructions allow it.
Put the Main Brush Back Together
Reinstall the main brush only after cleaning is complete and every washed component is dry. Correct alignment allows the roller to turn without rubbing against the housing.
- Check the brush. Confirm that no loose hair remains around its ends.
- Reattach the end caps. Fit any removable caps or bearings in their correct positions.
- Align the roller. Match the drive end with the corresponding fitting inside the brush compartment.
- Seat the brush. Lower the other end into its support without forcing it.
- Check rotation. Turn the brush gently by hand to check for binding where the design permits.
- Close the cover. Secure every latch or fastener until the cover sits properly.
Some brush covers make an audible click when fully locked. Others use screws or sliding catches.
Never run the robot with its brush cover loose or missing unless the manufacturer specifically instructs you to do so for testing.
Once the brush is secure, turn the robot on and start a short cleaning cycle on a clear floor.
The cleaning is successful when the roller works without unusual noise, no brush error appears, and the machine collects visible debris normally.
How Often to Clean the Main Brush
Weekly cleaning is a practical starting point for many robot vacuums, especially in homes with pets or long hair. However, the correct interval depends on your model and how quickly debris accumulates.
The iRobot main brush care guidance recommends cleaning Roomba brushes once a week, or twice a week in homes with pets. It also recommends brush replacement every 6 to 12 months, or as needed.
Other manufacturers may recommend different schedules. Some Xiaomi models specify cleaning every two weeks, while certain eufy models have longer intervals.
| Household Conditions | Suggested Cleaning Routine |
|---|---|
| Typical household | Start with a weekly check and follow your model’s schedule. |
| Homes with pets | Inspect frequently; many models benefit from cleaning twice a week. |
| Long hair or heavy shedding | Check after cleaning runs and remove tangles as they appear. |
| Light use and little debris | Follow the manufacturer’s interval, which may be longer than weekly. |
You should also inspect the roller whenever you notice reduced pickup, strange sounds, or a brush-stuck warning.
Replace the brush if its rubber fins are torn, its bristles are badly worn, or its bearings remain stiff after cleaning.
A replacement interval of 6 to 12 months is common for several manufacturers, but visible damage can justify earlier replacement.
What If the Main Brush Still Won’t Spin?
If your main brush still does not rotate after cleaning, check its end caps, installation, and housing before assuming the motor has failed. A small obstruction or poorly seated roller can prevent normal movement.
Work through these checks in order:
- Inspect the roller ends again. Remove any hair hidden under detachable caps.
- Check the brush housing. Look for compacted dirt, thread, or foreign objects around the drive fitting.
- Reinstall the brush. Confirm that both ends fit correctly and that the cover is locked.
- Inspect for damage. Look for bent shafts, cracked end caps, torn rubber, or seized bearings.
- Test on a suitable floor. Thick carpet can overload some brush systems, so a clear hard floor may help identify the cause.
- Follow the model’s error instructions. Use the recommended troubleshooting procedure if the warning persists.
The BISSELL EV675 brush troubleshooting guide recommends checking end-cap movement, inspecting the roller for damage, and confirming correct installation.
If the brush remains stuck, a worn roller or a problem with its drive system may be responsible. Contact the manufacturer or an authorized repair service for further diagnosis.
Do not attempt to repair internal motor wiring or electrical components unless you have the appropriate training.
Key Takeaways
- Hair hidden beneath removable end caps can prevent rotation even when the center of the brush looks clean.
- Not every robot vacuum brush is washable. Follow the cleaning method approved for your exact model.
- Weekly inspections are a useful starting point, but pets and long hair may require more frequent cleaning.
- Replace rollers with damaged fins, worn bristles, or bearings that remain stiff after cleaning.
- If cleaning does not restore movement, check roller alignment and the drive connection before seeking repair.
Frequently Asked Questions
How Do I Clean the Main Brush on My Roborock?
Turn off your Roborock, remove the main brush cover, and lift out the roller. Clear tangled hair from the bristles, ends, and removable bearings. Reinstall the parts securely. The exact method varies by model, as shown in the Roborock S6 maintenance instructions. Avoid washing unless your model permits it.
My Roomba Main Brush Is Stuck. What Can I Do to Fix It?
Turn off your Roomba and remove its brush rollers. Clean hair from the roller ends, beneath detachable caps, and inside the brush compartment. Reinstall the brushes in their correct positions and test the robot. If the problem continues, inspect the rollers for damage and contact iRobot support if necessary.
What Are the Most Common Problems With Robot Vacuums?
Common robot vacuum problems include tangled brushes, reduced suction, clogged filters, charging failures, battery issues, and navigation errors. Dirty sensors and wheels can also interrupt cleaning. Regular maintenance prevents many simple problems, but persistent motor, battery, or electronic faults may require professional repair or replacement parts.
How to Clean a Vacuum Brush Head?
Turn off and disconnect the vacuum before cleaning its brush head. Remove the brush roll if the design allows, cut away wrapped hair, and wipe the roller and accessible end caps. Clear debris from the housing, then reinstall the parts correctly. Only rinse components approved for washing and let them dry completely.
Conclusion
Cleaning your robot vacuum’s main brush regularly helps prevent hair tangles, poor pickup, and unnecessary wear. Focus on the roller ends and bearings, where hidden debris often collects.
Follow your model’s instructions for washing and replacement, and always reinstall dry components correctly. Make brush inspection part of your regular maintenance routine so your robot can clean floors with fewer interruptions.
Sources
- iRobot: Main Brush Care for All Roomba Models: Brush cleaning frequency, end-cap maintenance, and replacement recommendations.
- ECOVACS: Main Brush Removal, Cleaning, and Installation: Brush obstruction symptoms, removal, cleaning, and reassembly.
- Xiaomi: Robot Vacuum X20 Pro Main Brush Cleaning: Safe hair removal, brush bearings, and maintenance instructions.
- eufy: X10 Pro Omni User Manual: Model-specific brush washing, drying, and reinstallation procedures.
- BISSELL: EV675 Brush Not Turning: Checking roller damage, end-cap movement, and correct installation.
- Roborock: S6 General Maintenance: Brush cleaning and hair removal for the Roborock S6.