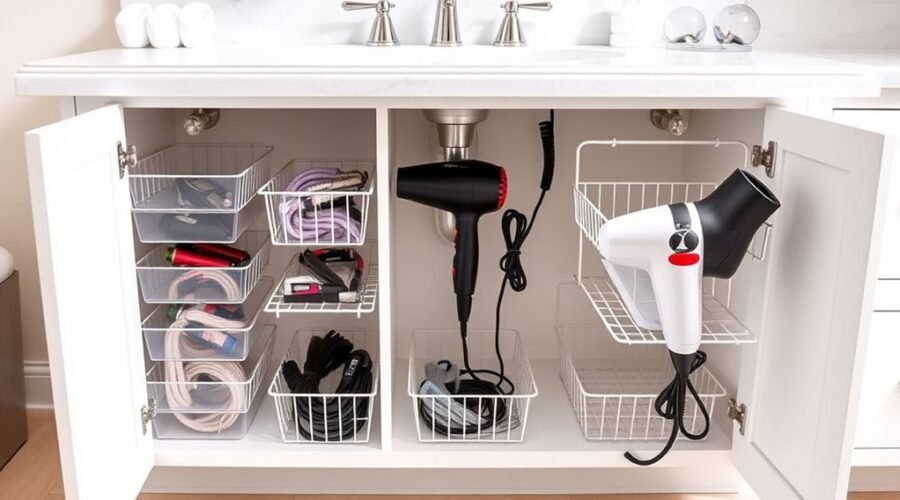
Under-sink hair tool storage can keep your bathroom counter clear without making your styling routine harder. The key is to use organizers that fit around plumbing, keep cords untangled, and protect electrical tools from moisture. With careful measurements and a few simple storage accessories, you can create a cabinet that stays tidy and easy to use.
Quick Answer
To organize hair tools under the sink, first check that the cabinet is dry and free of leaks. Measure around pipes, hinges, and shutoff valves. Use moisture-resistant bins for cooled tools, small containers for attachments, and hooks for loose cords. Always unplug hot tools and let them cool outside the cabinet before storing.
At a Glance
| Difficulty | Beginner-friendly organization; basic woodworking skills for an optional DIY shelf |
| Tools Needed | Flexible measuring tape, storage bins, labels, and hooks; wood panels, support strips, and woodworking tools for a custom shelf |
Pick the Right Under-Sink Hair Tool Storage
)
The best under-sink hair tool storage combines moisture-resistant containers, vertical organizers, and accessible compartments. Choose a setup that fits your cabinet without blocking pipes, shutoff valves, or the cabinet doors.
Start by separating your hair tools into groups. Keep frequently used items toward the front and occasional accessories farther back.
- Hair dryers: Use a deep bin or a holder that supports the dryer without bending its cord.
- Flat irons and curling irons: Store completely cooled tools in separate compartments or suitable holders.
- Brushes and combs: Place them in upright containers or divided baskets so they are easy to grab.
- Attachments: Keep diffuser heads, concentrator nozzles, and styling accessories together in a small labeled bin.
- Cords: Use loose loops, clips, or hooks to stop tangles without putting tension on the wires.
Clear bins make it easier to see what you have. Stackable drawers can use empty vertical space, while pull-out organizers help you reach items near the back.
Choose plastic or other easy-to-clean, moisture-resistant materials for containers near plumbing. Avoid leaving electrical tools directly on a cabinet floor that could become wet.
Before installing anything, inspect the cabinet for dampness, water stains, or leaks. The EPA’s moisture prevention guidance recommends fixing water problems promptly and controlling indoor humidity to reduce mold growth.
If the cabinet regularly becomes wet, use a dry drawer or another storage location until the moisture problem is fixed. No organizer can make a leaking space suitable for electrical appliances.
Recommended Products

[Size Check - Min Requirements] Inside Depth > 4.5", Door Thickness ≤ 1.1", Cabinet Door Width > 12", Top Door Gap > 1/8"

PERFECT SIZE HOT HAIR TOOL HOLDER - At 12" wide x 7" deep x 6" tall, this hair tool caddy securely holds all your hair tools. This is the perfect hair dryer holder, hair straightener holder, curling iron holder, hair brush holder, hair care organizer and MORE!

[Size Check - Min Requirements]Inside Depth > 4.5", Door Thickness ≤ 1.1", Cabinet Door Width > 12", Top Door Gap > 1/8"
Measure Your Cabinet Before You Buy
Measure your cabinet’s usable width, height, and depth before choosing an under-sink organizer. The space around the plumbing matters more than the cabinet’s outer dimensions.
A flexible measuring tape makes it easier to check narrow corners and the areas beside drainpipes. Empty the cabinet first so you can identify obstacles and measure accurately.
- Measure the interior width. Check the distance between the cabinet’s side walls and note where pipes reduce the available space.
- Measure the usable height. Start at the cabinet floor and check the space beneath pipes, fixtures, or existing shelves.
- Check the depth. Measure from the inside front edge to the back wall. Include the space taken up by plumbing connections.
- Measure your hair tools. Check the full length and width of your dryer, straightener, or curling wand. Include attachments that will remain fitted during storage.
- Test door clearance. Check hinges, door-mounted racks, and the path the door follows when closing.
Remember that a bin’s outside dimensions are not the same as its usable interior space. A container may fit inside the cabinet while still being too small for your longest tool.
Also leave enough space to reach plumbing shutoff valves. You should not have to dismantle a permanent organizer to shut off the water during a leak.
Pro Tip: Make a simple paper or cardboard template of your largest organizer before buying it. Place the template inside the cabinet and close the doors. This helps reveal blocked hinges, pipe interference, and wasted space without purchasing the wrong size.
Finally, check where the cords and hair products will sit. Plan enough space for loose cord loops, small baskets, and easy removal of each tool.
Build a DIY Under-Sink Shelf
A DIY under-sink shelf can create storage around awkward plumbing without requiring a complete cabinet renovation. The simplest design uses a removable shelf supported by strips or side supports, leaving the plumbing accessible.
If you already have basic woodworking tools, you can adapt the shelf to your cabinet’s exact shape.
Recommended Products

【Sliding Drawer Design】The bottom drawer features a pull-out design, providing a convenient way to access items in a limited space.

𝐌𝐚𝐱𝐢𝐦𝐢𝐳𝐞 𝐔𝐧𝐝𝐞𝐫 𝐒𝐢𝐧𝐤 𝐒𝐩𝐚𝐜𝐞 - Designed with a custom-fit silicone mat and L-shaped structure, this under sink organizer fits perfectly around plumbing while protecting cabinets from water, spills, and leaks. Measuring approximately 11.8"W x 15.9"D x 13.8-16.9"H, it’s ideal for most kitchen and bathroom cabinets.

<b>IMPORTANT: MEASURE CABINET BEFORE PURCHASE | ADJUSTABLE FOR PIPE OBSTACLES<b>: Please watch our installation video for reference. This under‑sink shelf features telescopic rods for length adjustment, multi‑position mounting holes for height adjustment, and a removable side panel to bypass drain pipes. If you are unsure whether your cabinet fits, we DO NOT recommend purchasing. Measure cabinet inner width, height & depth; account for drainpipes, cabinet dividers and plumbing parts before ordering to avoid return due to poor fit.
Materials for a Custom Shelf
- Wood paneling, such as the original 1/2-inch MDF shelf material
- Wood strips or suitable shelf supports
- A measuring tape and pencil
- A saw and appropriate protective equipment
- Suitable fasteners and a support board
- Primer and paint or another suitable protective finish
- Optional storage bins and cabinet-door hooks
For bathroom use, moisture-resistant paneling or properly finished plywood is worth considering. Ordinary MDF can swell when exposed to water or high humidity, as explained in this woodworking reference on MDF properties.
Even moisture-resistant wood products need protection from plumbing leaks. Seal exposed edges and follow the panel manufacturer’s finishing instructions.
How to Build the Shelf
- Mark the available space. Use your cabinet measurements to plan a shelf that fits beside or around the plumbing.
- Cut the panel. Shape it to fit the cabinet and allow clearance around pipes, valves, and fittings.
- Prepare the supports. Position wood strips along the cabinet sides or use a suitable freestanding support frame.
- Add stability. Fit a support board where needed without drilling into or placing pressure on plumbing.
- Finish the surfaces. Seal and paint the shelf, including its cut edges. You can match the cabinet exterior for a coordinated appearance.
- Install and test. Set the shelf in place and check that it stays stable under the intended storage load.
Use supports suited to the shelf material, span, and expected weight. Avoid attaching a shelf to plumbing or relying on weak cabinet panels to carry heavy loads.
Keep the shelf removable if possible. This makes it easier to clean the cabinet and reach plumbing connections.
Concealed cabinet door hinges are useful if your design includes a hinged front panel. They are unnecessary for a basic fixed shelf, but existing door hinges must remain unobstructed.
Once the structure is ready, add separate holders for cooled hair tools. You can also fit six hooks inside the cabinet door if its size and weight limits allow.
The finished shelf should hold your tools securely while leaving room for labeled bins and loose cords.
Add Hooks and Bins for Cords
Adhesive hooks and small bins can prevent hair-tool cords from becoming tangled under the sink. The safest approach is to organize cords after the appliances are unplugged and completely cool.
Install hooks on a clean, dry cabinet door or side panel. Choose locations where cords will not catch on hinges, shelves, or stored products.
For humid bathrooms, select adhesive hooks designed for those conditions. The manufacturer’s Command bathroom hook instructions explain how to prepare the mounting surface and allow the adhesive to bond.
Always follow the hook’s specified weight limit. A small adhesive hook may support a loosely looped cord but might not safely hold a heavy hair dryer.
Give each hair tool its own storage spot and keep its unplugged cord in a loose loop to prevent tangles and unnecessary strain.
Recommended Products

【STURDY AND POWERFUL】Strong self adhesive and upgraded 304 Brushed Stainless Steel adhesive hooks can provide extra strength and durability. Each hook can hold up to 15 lbs/6.8kg.

Adjustable & Customizable Spacing for All Your Tools - Unlike fixed-position hooks, our sliding 8-hook design lets you adjust each hook’s position freely to fit different-sized utensils, from large spatulas to small cleaning brushes. Maximize your cabinet space and keep frequently used items organized without crowding.

【Heavy Duty Adhesive Wall Hooks & Multi-Scene Use】These 13lb load-bearing hooks are ideal for towels, coats, keys, plants and bathroom supplies. Widely used in home, kitchen, bathroom and garage. 8 Pack included
Simple Ways to Organize Cords and Accessories
- Use individual hooks: Hang loose cord loops separately so they do not overlap.
- Choose clear bins: Group attachments, brushes, and smaller styling accessories.
- Add labels: Mark containers by tool category so everyone knows where items belong.
- Keep a daily-use basket: Place frequently used brushes, clips, and other essentials near the cabinet front.
- Check the setup regularly: Return stray accessories to their bins and remove items you no longer use.
Do not wrap power cords tightly around curling irons, straighteners, or dryer handles. Tight wrapping can place stress on the cable and its connection points.
Small magnetic strips may help organize suitable metal hair clips, but they should not be relied on to support electrical appliances or cords.
Before finishing, close the cabinet doors and check that no cords become pinched.
Store Hot Tools Safely
Hot hair tools need a safe cooling area before they go under the sink. Unplug each appliance after use and allow it to cool completely on a suitable heat-resistant surface outside the closed cabinet.
A silicone heat-resistant mat or a stable, manufacturer-approved cooling holder can protect the countertop during this process. Follow the heat rating and use instructions for the mat or holder.
Warning: Never place a hot or plugged-in styling tool inside a closed cabinet. Keep heated surfaces away from towels, plastic containers, paper, and hair products. Allow tools to cool fully before putting them into storage bins, sleeves, or canisters.
Electrical Safety First’s hair-styling appliance guidance recommends unplugging straighteners and curling tongs after use, cooling them on a heat-resistant surface, and avoiding tight cable wrapping.
Choose Safe Storage for Each Tool
After cooling, place flat irons and curling wands in individual compartments, heat-safe canisters, or suitable protective sleeves. This keeps their plates and barrels away from nearby products.
Store hair dryers in a roomy bin or dedicated holder. Avoid crushing the air inlet, attachments, or power cable beneath other items.
Keep accessories such as diffusers, concentrators, and styling brushes in separate containers. Make sure all attachments are cool and dry before returning them to storage.
Protect Hair Tools From Water and Humidity
Electrical appliances should remain away from standing water, leaking pipes, and damp cabinet surfaces. Never use the under-sink cabinet as a place to operate or charge hair tools.
The U.S. Consumer Product Safety Commission explains that hair dryers need built-in immersion protection to reduce electric shock risks if they contact water.
This protection does not make a dryer waterproof or safe to leave plugged in near a sink. Keep appliances unplugged whenever they are not being used.
Run the bathroom exhaust fan when moisture builds up, and keep the cabinet free of leaks. Do not store damp towels or wet styling accessories against electrical tools.
A well-arranged cabinet should let you remove each tool without pulling on its cord or disturbing the plumbing.
Frequently Asked Questions
How to Store Hair Tools Under the Sink?
Store hair tools under the sink in moisture-resistant bins, drawer dividers, or dedicated compartments. Measure the cabinet before choosing organizers, and use loose cord loops to prevent tangles. Keep attachments together in labeled containers and use vertical storage where space allows. Always unplug and cool heated tools before putting them away.
What Are Some Effective Ways to Organize Hair Products in the Bathroom?
Organize bathroom hair products by category and how often you use them. Keep daily products in an accessible basket and less-used items on shelves or in labeled containers. Drawer dividers work for smaller accessories, while travel organizers keep portable styling supplies together. Store products according to their labels and away from heated appliances.
What Are Some Good Ideas for Organizing Under a Bathroom Sink?
Good under-sink organization ideas include clear storage bins, pull-out drawers, stackable shelves, and cabinet-door hooks. Choose containers that fit around plumbing and leave shutoff valves accessible. Use dividers for small items and a separate holder for cooled hair tools. Moisture-resistant materials are especially useful in bathrooms.
What Is the Best Way to Organize Items Under the Sink?
The best way to organize items under the sink is to group similar products and give each group a defined space. Use baskets, shelf risers, drawer dividers, and hanging organizers based on your cabinet dimensions. Keep frequently used items near the front, label containers, and leave space to inspect plumbing and clean the cabinet.
Can You Store a Hot Flat Iron in an Under-Sink Cabinet?
No, a hot flat iron should not be placed inside a closed under-sink cabinet. Unplug it and let it cool completely on a suitable heat-resistant surface before storing it. Once cool, use a dedicated compartment or protective holder. Keep the appliance away from water, towels, and products that could be damaged by heat.
What Should You Do if the Under-Sink Cabinet Is Damp?
Do not store electrical hair tools in a damp under-sink cabinet. Remove the tools and check for leaking plumbing, condensation, or water damage. Fix the moisture source and dry the cabinet thoroughly before using it for storage. If dampness continues, choose a dry drawer, wall organizer, or another protected location.
Conclusion
Effective under-sink hair tool storage starts with a dry cabinet, accurate measurements, and simple organizers that fit around plumbing. Clear bins, stackable shelves, and hooks help keep tools and accessories accessible without wasting space.
Start by measuring your cabinet and sorting the tools you use most often. Then choose storage that fits your routine, and always let heated appliances cool completely before putting them away.
Sources
- U.S. Environmental Protection Agency: Moisture control, water leaks, and mold prevention.
- Woodworking Network, MDF Properties: Material strength, moisture sensitivity, and cabinet shelf considerations.
- Command Bathroom Solutions: Adhesive hook installation and bathroom mounting instructions.
- Electrical Safety First: Safe cooling, unplugging, cord handling, and storage of heated styling tools.
- U.S. Consumer Product Safety Commission: Hair dryer immersion protection and electrical shock hazards.