How to Tighten Loose Sofa Legs
To tighten loose sofa legs, turn the sofa upside down on a soft surface, remove each loose leg only if it is designed to come off, and inspect the screws, hanger bolts, T-nuts, insert nuts, mounting plates, and wood frame. Tighten sound hardware by hand, replace stripped or bent parts, and rebuild damaged screw holes with glued wood dowels or toothpicks before you reinstall the leg. If the frame feels weak, add a compatible metal bracket or mounting plate secured into solid wood instead of relying on a longer screw alone.
Quick Answer
To tighten loose sofa legs, flip the sofa upside down, confirm the affected leg is removable, and inspect the screws, T-nuts, insert nuts, hanger bolts, mounting plates, and frame. Replace stripped hardware, repair damaged wood holes with glued wood dowels or toothpicks, and reinforce a weak leg mount with compatible hardware secured into sound wood. Reattach the leg firmly, check its alignment, and use a suitable furniture leveler if an uneven floor is causing the sofa to rock.
Key Takeaways
- Confirm the sofa leg is designed to be removed before forcing it to turn or detach.
- Inspect each leg and attachment point before you tighten anything.
- Replace stripped screws, T-nuts, insert nuts, or bent hanger bolts instead of forcing them back in.
- Use glued wood dowels or toothpicks to rebuild stripped wood holes before re-drilling.
- Add compatible metal brackets or mounting plates only where the frame needs more support.
- Check leg alignment and floor level before you set the sofa back down.
Quick Repair Decision Guide
Match the repair to the damage you find. A loose but healthy screw may only need tightening, while stripped wood, damaged threaded hardware, or cracked framing needs a stronger repair before the sofa carries weight again.
| What You Find | Best Fix | Do Not Do This |
|---|---|---|
| Loose screw with good wood grip | Tighten by hand after checking alignment | Over-tighten until the wood cracks |
| Stripped screw hole | Fill with glued dowels or toothpicks, let cure, then drill a pilot hole | Drive the same screw back into the empty hole |
| Damaged T-nut or insert nut | Replace it with hardware that matches the existing thread | Force a mismatched hanger bolt into it |
| Weak or cracked mounting area | Reinforce the leg mount with compatible hardware secured into solid wood | Use a longer screw without repairing the frame |
| Leg does not appear removable | Inspect how it joins the frame and use the correct repair for that construction | Twist or pry the leg until it breaks free |
| Sofa rocks but the hardware stays still | Check floor level and leg height, then use an appropriate leveler or shim if needed | Trim a leg before confirming the floor is the problem |
Identify Common Causes of Loose Sofa Legs
Sofa legs can loosen as repeated movement works on the hardware and attachment points. Frequent moving, angled loads, and an uneven floor can make an existing weak connection more noticeable.
Original hardware, such as T-nuts, insert nuts, hanger bolts, and mounting plates, can strip, bend, loosen, or shift over time. Large stripped holes may stop screws or inserts from gripping the frame, so the damaged wood or hardware must be repaired rather than simply tightened again.
Threaded inserts and T-nuts are designed to provide threaded attachment points in wood for bolts and furniture components. For a useful overview of how they differ, see Rockler’s guide to T-nuts and threaded inserts.
Check your sofa legs as part of regular furniture care. Early checks can help you catch loose hardware before a mounting point becomes badly damaged.
Find Exactly What Is Loose
Before replacing parts, hold the leg and watch the attachment point while you move it gently. The part that moves tells you where to focus the repair.
| What Moves | Likely Problem Area | What to Inspect |
|---|---|---|
| Leg rotates while the mounting plate stays still | Leg threads or hanger bolt connection | Hanger bolt, threaded insert, and leg |
| T-nut, insert, or plate moves against the frame | Mounting hardware or stripped frame hole | Fastener holes, plate screws, T-nut, or insert nut |
| Wood around the attachment point flexes or opens | Frame or mounting-block damage | Cracks, crushed wood, loose joints, and solid support around the mount |
| Nothing moves at the joint but the sofa rocks | Floor or leg-height difference | Floor level, leg length, glides, pads, and levelers |
Get Your Tools and Supplies Ready
Gather your tools before you flip the sofa. A clear setup helps you work faster and reduces the risk of damaging the frame.
| Tool/Supply | Purpose | Notes |
|---|---|---|
| Phillips screwdriver | Removes and installs screws | Match the tip size to the screw head |
| Battery-powered drill | Speeds up removal and makes pilot holes | Use the right bit and low torque |
| Pliers | Adds grip on accessible hardware | Use carefully to avoid damaging threads |
| Metal brackets or mounting plates | Reinforces a weak leg mount | Choose hardware that fits the frame and leg thread |
| Wood dowels or toothpicks | Rebuilds stripped wood holes | Use with wood glue for a wood-to-wood repair |
| Wood glue | Bonds dowels or toothpicks in damaged wood holes | Follow the label and allow the repair to cure before loading it |
| Epoxy | May secure compatible replacement hardware in repair methods that call for it | Use only where appropriate and follow the product instructions |
| Felt pads | Protects hard flooring and handles very small contact differences | Do not use ordinary felt pads to correct a significant height difference |
| Furniture levelers | Corrects a leg-height difference on an uneven floor | Use a type suitable for the leg and furniture weight |
Set aside a small container for screws, washers, and old insert nuts. Losing one fastener can make the repair harder than it needs to be.
Recommended Products

Durable Heavy-Duty Construction: Crafted from premium-grade steel for unmatched strength, ensuring long-lasting support to reinforce wobbly legs, cracked joints, or weakened furniture frames

Package Contents: You will receive 4 pieces of sturdy T-nut fasteners, 12 pieces of M4x25mm fixing screws and 4 pieces of mesh rubber pads.The perfect fastening kit can help you strengthen and repair furniture.

Strengthen/ Repair Furniture- No more wobbly legs ! This furniture leg attachment plates are designed for attaching legs to new or damaged sofas, couches, seats, ottomans and more.
Prepare Your Sofa for Repair
Flip the sofa upside down on a blanket or rug so you can reach the legs and hardware. Remove cushions and pillows first to lighten the sofa and clear your workspace.
Before you unscrew a leg, confirm it is designed to be removable. If the leg appears integral to the frame or does not release normally, do not force it. Inspect the construction and repair the actual attachment method instead.
Inspect each removable leg and connection point for cracks, stripped holes, loose screws, bent hanger bolts, or damaged brackets. Check the wooden frame around each leg before you choose a repair method.
Keep replacement parts nearby, such as new screws, T-nuts, insert nuts, wood dowels, metal brackets, mounting plates, or glue. Good preparation helps you finish the repair without stopping halfway.
Warning: Ask another person to help flip a heavy sofa so you don’t strain your back or damage the frame.
Remove Old Legs and Inspect Hardware
Carefully detach a removable leg so you can inspect the hardware and frame. Use a power drill or screwdriver as appropriate, but slow down if a screw head starts to strip.
Look closely at the T-nuts, insert nuts, hanger bolts, screws, washers, mounting plates, and brackets. Replace hardware with damaged threads, bent plates, or badly worn screw heads rather than forcing it back together.
Remove only the fabric or padding necessary to reach the leg attachment area. Keep the attachment point clean so replacement hardware can sit flat against the frame.
Select an Effective Repair Method for Loose Legs
Choose the repair method based on the damage you find. A loose screw needs a different fix than a cracked frame, stripped T-nut, or damaged hanger bolt.
Use this rule: tighten sound hardware, replace worn hardware, rebuild stripped wood, and reinforce weak attachment points. Do not rely on a longer screw alone when the surrounding material no longer provides a sound mounting point.
Recommended Products

COMPLETE 4-PIECE REPAIR KIT – Includes 4 heavy-duty metal T-plates (49mm x 49mm / 2"x2"), 4 M8 hanger bolts, 4 M8 female converters, and 16 screw adapters for 5mm unthreaded holes. Perfect for reinforcing wobbly legs on sofas, couches, chairs, tables, ottomans, and more.

Package Include:4pcs Furniture leg mounting plate(with Screws)
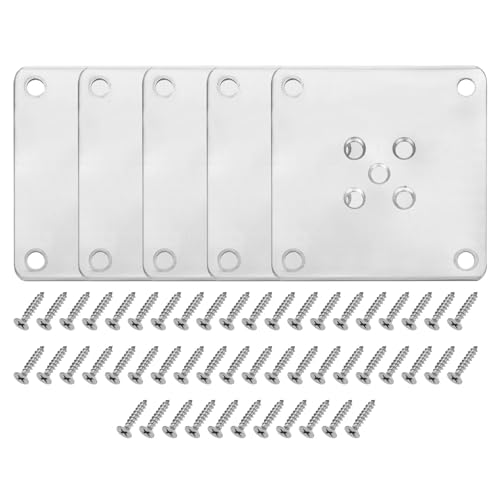
What You Get: You will receive 5pcs furniture leg mounting plates with the overall size of 90x90x2mm / 3.54x3.54x0.08inch(L*W*T), mounting hole diameter 5mm/0.2inch, and 50pcs 4x17mm/0.16x0.67inch flat head self tapping screws
Effective Repair Techniques
Use a compatible metal bracket or mounting plate when a removable leg needs more support from the sofa frame. Secure the hardware into sound structural wood so the attachment does not depend on damaged material around the original hole.
Replace a stripped T-nut or insert nut with hardware that matches the hanger-bolt thread. If a wood screw hole has stripped, one established repair is to rebuild the hole with wood and glue before re-drilling. Family Handyman’s stripped screw-hole guide demonstrates the wood-glue-and-toothpick method.
A battery-powered drill can speed up removal and installation, but it can also damage screw heads or wood if used aggressively. Start slowly, keep the bit straight, and finish tightening by hand when you need more control.
Tools and Materials Needed
Your main tools include a Phillips screwdriver, battery-powered drill, and pliers. Repair materials may include wood dowels, toothpicks, wood glue, compatible brackets or mounting plates, screws, T-nuts, insert nuts, and replacement hanger bolts.
Choose replacement threaded hardware that matches the existing hanger bolt. Mismatched threads can damage the leg, weaken the repair, or stop the leg from tightening fully.
Use felt pads primarily to protect hard floors and deal with very small contact differences. If one corner has a meaningful height gap because of an uneven floor, use an appropriate furniture leveler or other stable leveling method instead.
Safety Considerations During Repair
Wear safety goggles when drilling, especially while repairing damaged wood. Gloves can help protect your hands from splinters and sharp metal edges.
Work in a well-lit area and keep loose tools away from your feet. Check your drill bit, screwdriver tip, and pliers before you start.
Use sturdy, compatible hardware and avoid over-tightening screws. Too much force can crack the frame, strip the hole again, or damage the leg threads.
How to Properly Install New Hardware or Brackets
Installing new hardware correctly matters as much as choosing the right parts. A straight, snug fit keeps a removable sofa leg stable and helps prevent future wobbling.
Set aside enough time for removal, inspection, and repair. A simple tightening job may need no curing time, but a glued wood repair must cure according to the adhesive instructions before the sofa carries normal weight again.
Recommended Products

【Set of 4 Leg Mounting Plate】: This package includes a set of four leg mounting plates, 4 pcs M8 hanger bolts, 4 pcs M8 female converters and 16 pcs 16 pcs of screw adapters for 5mm unthreaded holes, providing you with all the necessary components to securely attach legs to your furniture. Each plate is designed for stability and durability, ensuring long-lasting support.

【Universal Compatibility】 Fit most table legs, furniture legs, and sofa brackets, making them ideal for repairing wobbly legs or attaching new legs to damaged couches, ottomans, and chairs. The square mounting plate design ensures a secure fit for removable furniture legs and provides long-lasting stability.

【Complete Repair Kit】Each set includes 4 mounting plates and 12 screws to ensure a secure fit
Check the Mounting Point Before Installation
Check the structural support before you install a bracket or mounting plate. Screws need suitable material to grip, so avoid fastening a structural repair only into upholstery, padding, or a badly damaged edge.
| Check | What It Tells You | Next Step |
|---|---|---|
| Wood around the hole | Shows whether the fastener has sound material to grip | Repair stripped or cracked areas before drilling |
| Thread size | Confirms the leg bolt matches the nut or plate | Match replacement hardware to the existing thread |
| Bracket or plate position | Shows whether the repair reaches sound structural material | Position the hardware where it can be secured properly without changing leg alignment unnecessarily |
Step-By-Step Installation Process
Follow the steps in order so each removable leg sits straight and secure.
- Flip the sofa over and remove cushions, pillows, and loose items.
- Confirm the affected leg is designed to be removed.
- Remove the old leg screws or bolts with the appropriate screwdriver, wrench, or drill.
- Inspect the frame, holes, T-nuts, insert nuts, mounting plates, and hanger bolts for damage.
- Fill stripped wood screw holes with glued wood dowels or toothpicks when that repair matches the damaged connection, then let the glue cure.
- Drill correctly sized pilot holes into sound wood when the repair requires new screws or brackets.
- Align the replacement hardware with the leg and frame before tightening.
- Attach the leg firmly, then finish the final turns by hand when appropriate.
- Check all legs for even height and the intended alignment before flipping the sofa back upright.
If the leg still rocks after tightening, remove it and inspect the connection again. The problem may come from a hidden crack, moving mounting plate, worn hanger bolt, damaged insert, or uneven floor.
Ensuring Secure Attachment
Drill correctly sized pilot holes when the repair calls for new screws in wood. Pilot holes help guide a fastener and reduce the risk of splitting; Lowe’s pilot-hole guide explains the basic sizing and drilling process.
Use a compatible metal bracket or mounting plate when the attachment point needs additional support. Secure it into sound material and check that the repair does not push one leg farther out or change its effective height.
Before installing a new T-nut, insert nut, or threaded mounting plate, confirm it matches the hanger bolt. Forcing mismatched threaded hardware can damage both components.
| Step | Action | Purpose |
|---|---|---|
| 1 | Drill the correct pilot holes when required | Improves screw alignment and reduces splitting risk |
| 2 | Attach compatible reinforcement hardware | Provides a sound mounting point |
| 3 | Check thread compatibility | Confirms the hanger bolt fits the nut or plate |
| 4 | Use wood glue with a wood plug repair | Rebuilds damaged wood around a stripped screw hole |
| 5 | Tighten connections evenly | Maintains alignment without over-stressing the frame |
Reattach Legs Securely for Stability
Reattach each removable sofa leg only after you repair damaged wood and replace worn hardware. A damaged attachment point can loosen again quickly if it is simply tightened without fixing the underlying problem.
- Repair the mount: Rebuild stripped wood or replace damaged threaded hardware before reinstalling the leg.
- Reinforce when necessary: Add a compatible bracket or mounting plate only when the attachment point needs additional support.
- Tighten the connection: Secure the leg without forcing mismatched threads or over-tightening the frame screws.
- Level the sofa: Once upright, check the floor contact and use suitable pads or levelers for the problem you actually find.
After you tighten the legs, press gently on each corner of the sofa. If a leg, mounting point, or section of frame moves independently, inspect that area again before regular use.
Ensure Proper Alignment of Sofa Legs
Proper alignment helps your sofa sit evenly and keeps one attachment point from carrying more stress than intended. Flip the sofa onto a soft surface before you measure or adjust removable legs.
Compare the position and angle of each leg. Tall or angled legs should follow the sofa’s original design rather than being forced perfectly vertical.
Mark attachment points before drilling new holes. After securing the screws or bolts, double-check that each leg sits in the intended position and that replacement hardware has not shifted one leg outward or changed its effective height.
Pro tip: Tighten multiple fasteners in stages instead of fully tightening one side first. This makes it easier to keep a mounting plate or bracket aligned while you work.
Common Mistakes to Avoid
Do not drive screws into damaged wood holes without repairing the wood first. The screw may feel tight initially but loosen again when the attachment is loaded.
Do not use threaded hardware that does not match the original hanger bolt or leg design. Mismatched parts can damage threads, prevent the leg from seating fully, or change the sofa’s alignment.
Do not assume every sofa leg is removable. If a fixed or integral leg does not release normally, inspect its construction instead of twisting or prying it loose.
Do not skip the alignment check before you flip the sofa upright. A shifted mounting plate or incorrectly positioned replacement bracket can make the sofa wobble even when every screw feels tight.
Do not cut or sand a leg shorter until you confirm the floor is not causing the wobble. For a small floor-contact difference, a suitable pad may be enough; for a meaningful height difference, an appropriate furniture leveler or stable shim is usually the better approach.
Final Touches for a Professional Finish
Once the legs and attachment points feel secure, finish the repair with a few checks that are easy to miss while the sofa is upside down.
- Inspect the hardware: Confirm screws, bolts, inserts, and plates sit correctly and no attachment point moves independently.
- Check alignment: Compare the angle and position of all legs before returning the sofa to normal use.
- Touch up the finish: Use matching stain or paint only on visible repair marks where needed.
- Protect and level the floor contact: Add the appropriate felt pad, glide, shim, or leveler for the surface and height difference.
Let wood glue, epoxy used in an appropriate repair, stain, or paint cure according to its product instructions before the sofa carries normal weight. Check the repaired leg again after the sofa has returned to regular use.
When to Call a Furniture Repair Professional
Call a repair professional if the sofa frame is cracked, a leg plate has torn out a large section of structural material, or the sofa still shifts after damaged hardware has been replaced. Professional help is also sensible for antique, high-value, or sentimental furniture when drilling or altering the original joinery could complicate restoration.
Stop using a corner that remains structurally unstable until the damaged attachment point or frame is repaired.
Frequently Asked Questions
How do you tighten loose sofa legs?
Turn the sofa upside down on a soft surface, confirm the affected leg is removable, and inspect the hardware. Tighten sound screws by hand, replace damaged T-nuts, insert nuts, mounting plates, or hanger bolts, repair stripped wood screw holes with glued dowels or toothpicks when appropriate, then reinstall the leg in its intended alignment.
How to Tighten a Sagging Sofa?
First determine whether the sofa is actually sagging or simply wobbling. Loose legs and mounting hardware can make the frame rock or sit unevenly, but a sagging seat more often requires inspection of the cushions, springs, webbing, frame joints, or support platform. Tighten loose frame or leg hardware where needed, but repair worn seating supports separately.
Can you fix a sofa leg with stripped screw holes?
Yes, many stripped wood screw holes can be repaired with wood dowels or toothpicks and wood glue. Let the glue cure according to its instructions, trim the repair flush if necessary, then drill a correctly sized pilot hole before reinstalling the screw. If the damaged connection uses a T-nut, threaded insert, or mounting plate instead of a wood screw, repair or replace that hardware using the correct thread and mounting method.
Should you use metal brackets on all sofa legs?
No. Reinforce only the attachment points that are weak unless the replacement mounting plate changes the leg position or height enough that matching hardware is needed on the other legs. Always confirm that the bracket, plate, T-nut, or insert matches the hanger-bolt thread and can be secured to sound structural material.
When should you replace a sofa leg instead of tightening it?
Replace the leg when the leg itself is cracked beyond a reliable repair, its threaded connection is badly damaged, or its hanger bolt is bent or cannot be secured correctly. Tightening a damaged component does not repair the underlying failure.
How often should you check sofa leg hardware?
Inspect the legs when the sofa begins to wobble, after moving it, or whenever you notice a mounting point becoming loose. For furniture that is moved frequently, an occasional visual and hand check can catch loose hardware before the mounting area becomes badly damaged.
Can an uneven floor make sofa legs feel loose?
Yes. A sofa can rock on an uneven floor even when its mounting hardware is tight. Watch the leg-to-frame connections while the sofa is gently rocked. If those joints stay still, check the floor and leg heights before trimming or replacing a leg. Use an appropriate pad for a tiny contact difference or a suitable furniture leveler or stable shim for a larger height difference.
Conclusion
A stable sofa starts with identifying exactly what is moving. Tighten sound hardware, replace damaged threaded parts, rebuild stripped wood holes, and reinforce weak mounting points only where the frame provides a suitable attachment.
Before regular use, check the leg alignment and floor contact, then test each corner gently for movement. If the frame itself is cracked or the repaired mount still shifts under light testing, keep that corner unloaded and have the structural damage repaired.